Thursday, November 24, 2016

Thanksgiving 2016

This day is over, but I thought I’d post about it anyway.

Right now I’m staying out of town with my Mom and Sister, in my Mom’s house, which is nearby. My son is home, tending to the homestead for now. Mom isn’t strong these days so I’m here to help her and help Sis.

We’ve worked all this week getting Thanksgiving foods ready. Mom also did what she could – chopping celery and onions, mixing up her famous bread cube dressing, and making deviled eggs. Sis and I took care of everything else.


The gathering this year wasn’t as big as in years past. One of Sis’s sons and his wife joined us, as did my older daughter. Her male friend stopped in and we got to meet him before he headed to his own extended family’s festivities, then he stopped back by to pick up Daughter so they could head home.


We had way too much food, of course. LOL We ate till we were more stuffed than any Thanksgiving Turkey, put away all the leftovers, cleaned up, and visited for quite awhile. It was really nice. Guests took home a lot of the leftovers, but there’s still enough to feed a small army that we’ll be using up as we can over the next few days.

Sis, Mom, and I had pie for supper because we’re adults and isn’t that what adults do? Well, we did have coffee with it at least.

I truly hope you all were able to celebrate this day with loved ones, as well.

Be thankful not just today, but every day.

Tuesday, November 8, 2016

Tuesday, November 8, 2016–Election Day

It’s been a crazy race so far, and I don’t have a clue who’ll win the Presidential election. I also will not share with you who my “favorite candidate” is because the truth is, I don’t have one.


I honestly believe true patriotism, statesmanship, and a love for the Constitution have gone right out the window this time. I also believe that the truth is a commodity in very short supply these days by either of the front-running candidates.


Now, I know candidates will stretch the truth. I know they will make promises they can’t possibly keep. I also know that neither one of the front-runners (and you know exactly who I’m talking about) are actually qualified to run this country. One, being a Washington insider who has her fingers in too many pies and will wind up beholden to the uber-wealthy supporters who fund her campaign. The other being a bully of a businessman who has screamed, shouted, mocked, and insulted his way to the top of his party.


One has been caught in lies and deception. People who have worked closely with her have suddenly wound up dead through “accident” or “suicide”. I believe she’s part of a bigger game plan with associates we aren’t seeing in public. What worries me about this one is that this person will eventually be impeached and found guilty, and the country will then be run by her vice president, who is likely just a puppet.


The other is out to simply divide the people of this nation and cause unrest. What worries me about him is how intense and radical his followers are, and how like the followers of many cruel and murderous leaders they are. Those historic leaders didn’t murder before they were elected. They got the support of the populace first, then proceeded.


I really hope everyone is prepared for the fallout of this election, because either way, we’re screwed. It’s way past time to stockpile.

Sunday, November 6, 2016

How to make salmon hash

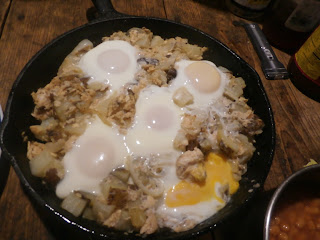
The name of the recipe almost explains what you’ll make. But, just in case, here’s how we made a delicious Salmon Hash one night with inexpensive ingredients we had on hand.

Salmon Hash
  • 1 tall can pink salmon, large bones removed and liquid reserved
  • 3 baked potatoes with the skin on, cubed
  • 1 medium onion, sliced thin
  • Schmaltz, butter, or your favorite oil
  • 1 teaspoon dried thyme
  • 2 teaspoons crushed red pepper
  • 1 tablespoon lemon juice
  • Salt & pepper to taste
  • 4 to 6 whole eggs (depends on how many you’re feeding)


Using a fork, break up the salmon.


Melt fat in an iron skillet, or other skillet you may have.


Sauté onions just till translucent.


Add cubed potatoes, salmon, seasonings, and lemon juice.


Stir all together well.


When everything is heated through nicely, break your eggs onto the top of the hash.


Put a lid on the skillet and allow to cook about 5 minutes or until eggs are done to your liking.


Make a gravy from the reserved liquid plus enough water to make 2 cups.

Gravy
  • 2 tablespoons schmaltz or your favorite fat
  • 3 tablespoons flour
  • 2 cups liquid, which includes the broth from the canned fish
Melt the fat and stir in the flour. Allow to cook without browning for about 2 minutes. Stir in the liquid. Keep stirring until it’s thick and bubbly. Serve over the salmon hash.


Serve with sides of your choice. We chose pork & beans and homemade bread. Also put homemade chili sauce on top.


And, of course, I uploaded a video to YouTube for your viewing pleasure. :)


Hope you enjoy it as much as we did!

How to cook meatloaf in a pressure cooker

For this recipe, I actually did use a pressure cooker with the gasket and weight in place. It turned out moist and delicious this way. No more dry meatloaf!

Pressure Cooker Meatloaf
  • 1 1/2 pounds ground meat (your choice; I used beef)
  • 1/2 cup oats, cracker crumbs, or binder of your choice
  • 1 tablespoon Worcestershire sauce
  • 1 egg, lightly beaten
  • 1 onion, finely minced
  • 1 can of any type canned tomatoes, well drained and pressed out. Keep the juice! (I used Italian seasoned.)
  • Salt & pepper and other seasonings to your taste
Here are pictures of the ingredients I used:


Mix all ingredients well, kneading it all together with your hands. Place in small loaf pan and push the meat mixture a little away from the sides of the pan. Place the loaf pan into a round cake pan to catch any drips and overflow.

Place two layers of canning rings into the bottom of your cooker, then the rack. Put the meatloaf into the canner as well centered as possible. 

Add water until it touches the rack.

This is very important for the cooking process and to prevent your cooker from warping.
Put on the lid and put the 10 pound weight on the vent pipe. You don’t have to do a 10 minute vent for a cooker like you do for a canner. Bring it up to 10 pounds pressure and cook about 20 to 25 minutes. Once it reaches pressure you can turn the heat down to maintain it. If your cooker has another option for the weight, just use the larger weight if needed.

When done, let the pressure drop naturally while you make a gravy topping out of the reserved tomato juice and either water or broth. I used a packaged brown gravy mix but you can make your own recipe for gravy. Using the tomato juice is the key to a gravy that tops the meatloaf very nicely with a good taste.


And here's a video I posted to YouTube that might make it easier to understand!


Enjoy your meatloaf and let me know if you tried this!

Saturday, November 5, 2016

How to make potato soup

This is probably one of my all-time favorite soups to make. I’m pretty sure it ties right up there at the top with homemade chicken noodle soup. And it’s so easy to make. It takes few ingredients and a short amount of time to have a delicious, soul-warming soup to put on the table. Serve with biscuits, cheese and crackers, or oyster crackers.

Potato Soup
  • 3 medium to large potatoes, peeled and cut into about 1/2 inch cubes
  • 1 medium onion, finely chopped
  • 1 pint homemade or 1 can store bought chicken broth
  • 2 cups water
  • 1 can cream of celery soup
  • Salt and pepper to taste
  • 2 tablespoons schmaltz, butter, or oil for sautéing the onions
  • 1/2 cup cheese, optional but good! (I used store bought white American queso)
Sauté onions in the fat of your choice. I like schmaltz I rendered from chicken fat, but any nice tasting fat will do. Sauté just till they start to turn translucent but not brown.


Add your cubed potatoes and the broth and water. Add salt and pepper. Bring to a boil, then turn down heat and let simmer until potatoes are tender.


Add in the cream of celery soup. Stir it in well till all lumps are blended in. Bring it to a simmer.


Add the cheese of your choice.


Serve piping hot with crackers or biscuits.


Here's a video I did demonstrating the potato soup I made!


How to make biscuits in a pressure cooker

No, you don’t pressure cook them. You use a pressure cooker only as a stove top oven. Just like I did for the bread, I also made biscuits in an old, rather large pressure cooker that doesn’t have a gasket, a weight, or even an over-pressure safety plug anymore. If yours has all those things, just remove the gasket and leave the weight off for baking. Then, follow what I do. It doesn’t warp the cooker bottom using the dry heat because it’s not under pressure when you do this.


You can use store bought canned biscuits if you prefer. A can of those fits very nicely in an 8 inch round cake pan. I bought some disposable aluminum ones because my only round cake pan is 9 inch, so it’s really too large to go down in the cooker very well.

Here’s my biscuit recipe, more or less. You know how it is when you do things homemade. After awhile you do them by feel more than strict measurements, but this will work.

Homemade Biscuits
  • 3 cups self rising flour (or 3 cups flour, 3 teaspoons baking powder, 1/2 teaspoon salt)
  • 1 tablespoon sugar (optional)
  • 1/3 cup shortening
  • Milk to make stiff dough (Even better with buttermilk! If you use buttermilk, add 1/2 teaspoon of baking soda to the dry mix.)
Mix the sugar into the flour mixture (if you use sugar), then cut in the shortening with a pastry blender, two knives, a fork, or your hands. Slowly add milk until you get a rather stiff dough.


Turn dough out on a well floured surface and pat it out to about 3/4 inch thick. You can use your clean counter top, a cutting board, or a smooth kitchen towel dedicated to baking only. (I keep mine in a gallon zip bag.)


Do not knead the dough!
 
Cut out biscuits with a biscuit cutter. I actually use an old tomato sauce can that I’ve popped holes in the bottom. I’ve had it for many years and it’s exactly 1 cup for measuring flour plus it cuts out nice sized biscuits. The holes in the bottom let air escape so the biscuits don’t get stuck in the can due to a vacuum.


Gently place the cut biscuits into your baking pan. You may be able to push the remaining dough together and cut more biscuits until you’ve got it all used up.(Waste not, want not!)  Lower the pan into your pressure cooker that has a couple of layers of canning rings or something else to raise the pan off the direct heat of the bottom.

Turn on the heat to medium high, put the lid on the pan, and let it bake about 20 to 25 minutes. Check on things around the 20 minute mark to see if they’re getting done.

When the bottoms are golden brown, take the baking pan out of the cooker, flip the biscuits over on a plate, then slide them back into the baking pan to finish browning. That will take about another 5 or 10 minutes. (I did try flipping them with tongs but I found that I wrecked the biscuits too much doing that. Now I just flip the whole thing out as described above.)

When done, turn them out onto a plate and enjoy warm with butter and jelly, or with your meal.


Here’s a little video to help you see what I was doing with the pan.


Of course, these biscuits can also be baked in a conventional oven. Preheat to 400*F and bake them off till the tops are light golden brown.

Comment and let me know if you made these and how they turned out for you!

Friday, November 4, 2016

How to prep and can sweet potatoes

We love canned sweet potatoes and because we live in the South, we can get them at a very good price around August or September every year. I buy 2 of the 40# boxes each year so I’ll have plenty for over the winter. We like them baked, fried, as part of calico potatoes, and canned to use as a side dish or make sweet potato pies.

Getting them peeled and ready to can, though, is hard work. The USDA recommendation is to wash them and boil them whole for about 15 minutes, then peel them. I used to do that before we moved off grid, but bringing in water several times to wash them, boil them, then drain them and get them hot again, then make a syrup to can them in is more difficult now. So, I changed my tactics. I do still wash them, but then I peel them right away. I can use a lot less water in washing them, then I can cut them up and put them all in one big pot for parboiling. I parboil them about 7 to 10 minutes.

Here is my step-by-step of prepping sweet potatoes for canning. I do follow the pressure canning time and pressure guidelines from the USDA.

I use an apple peeler with the corer/slicer part pushed out of the way. This goes much faster and I only have to do a little trimming.


After trimming, I can cut them into chunks that will go into the jars. For this time I wanted to use regular mouth pint jars so they needed to be small enough to fit in there.


The directions called for 11 pounds of potatoes for 9 pints of canned potatoes. I’m pretty sure now that they meant UNpeeled potatoes because I wound up with at least twice the amount needed for one canner load. I double stacked them in the canner so there were 18 pints, but I was able to fill the canner twice like that!


I brought them to a boil and boiled them for about 10 minutes to get them hot throughout and to start them getting somewhat soft. The recommended canning time was developed using only hot, parboiled sweet potatoes. It was not developed using raw sweet potatoes.


I put them into hot jars, added a tablespoon of sugar and a 1/2 teaspoon of salt to each jar, then poured boiling water over them. (Both the sugar and salt are for flavor only and have nothing to do with safe preserving.) I removed the air bubbles, wiped the rims well, and put on hot lids and rings. I did this one jar at a time. As each jar was filled, I placed it back into the pressure canner where the other jars were heating up. I had jars for the top layer heated with boiling water in them set aside.

When the bottom layer was filled, I put in another rack and put more jars in the top layer. Then I put the canner lid on, tightened it down, brought up the heat, let it vent for 10 minutes after it had a full and steady stream of steam, tightened the regulator, brought it up to pressure, then processed the pints of sweet potatoes for 65 minutes.

This is the large canner I use to double stack pints or smaller.


From Potatoes, Sweet - Pieces or Whole -- Safely canning sweet potatoes


After they were done and the pressure in the canner had dropped fully to 0, I took the jars out and put them on towels on the counter to cool. I don’t touch them for at least 12 hours. Then I check the seals, remove the rings, wash the jars, and write the product and date on the lid with a sharpie. I store them stacked in my tiny pantry area inside milk crates and with cardboard between layers. Stacking jars is okay according to both Ball and the NCHFP. Here’s what NCHFP says about it.

"If jars are stacked in storage, be careful not to disturb vacuum seals. It would be a good idea to not stack jars too high directly on top of each other; one manufacturer recommends no more than two layers high. It would be best to provide support between the layers as a preventive measure against disturbing the seals on the lower jars. Jars could be placed in boxes to be stacked, or use some type of a firm solid material across the jars as a supportive layer in between them."

-- From Storing Home Canned Foods at the NCHFP (National Center for Home Food Preservation)

The end product: Beautiful and tasty home canned sweet potatoes.